# ProxyBlob v2
🎉 New release ! _see [CHANGELOG](#changelog)_ 🎉

SOCKS proxy over Azure Storage service
## Overview
ProxyBlob is a tool designed to create SOCKS proxy tunnels through Azure Storage services. This is particularly useful in environments where direct network connectivity is restricted but `*.core.windows.net` is accessible.
The system consists of two components:
1. **Proxy Server**: Runs on your local machine or a remote server and provides a SOCKS interface for your applications
2. **Agent**: Runs inside the target network and communicates with the proxy through Azure Storage services
## Features
- SOCKS5 protocol (CONNECT and UDP ASSOCIATE)
- Communication through Azure Storage services (thanks to [aznet](https://github.com/atsika/aznet)!)
- Interactive CLI with auto-completion
- Multiple agent management
- Local or remote proxy server
- WebAssembly (WASM) agent for deployment in JavaScript runtimes (Bun, Node.js, etc.)
## Prerequisites
- Go 1.25 or higher
- An Azure Storage Account
### Storage Account
#### Azure
In order to use ProxyBlob, you will need an Azure Subscription to create an Azure Storage Account. Once you have a subscription, you can create a storage account in the Azure Portal or using the Azure CLI.
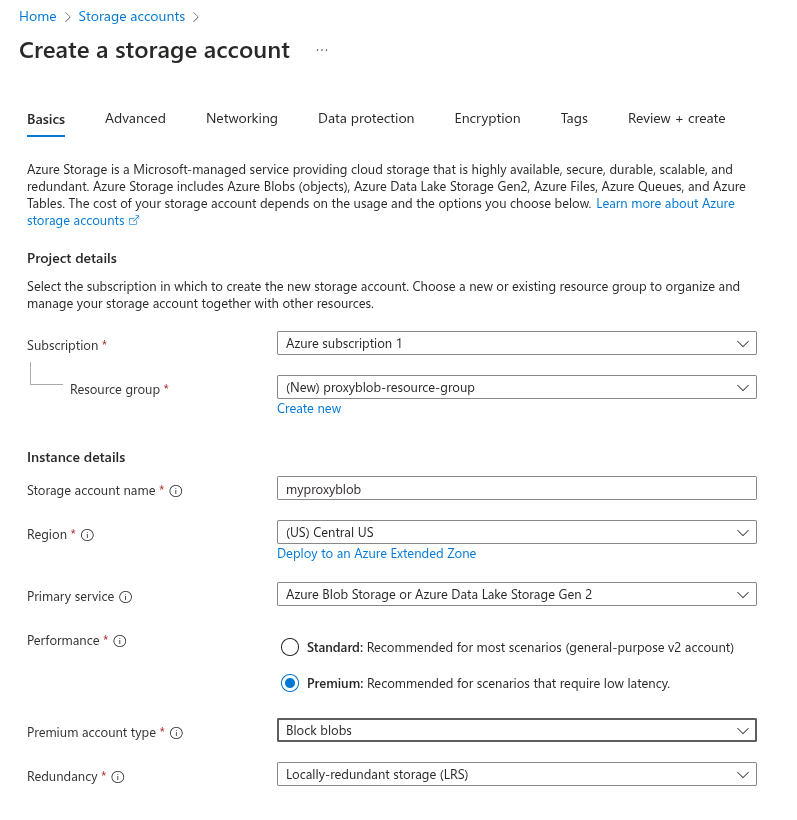
Here are the steps to create a storage account using the Azure Portal:
1. Go to [https://portal.azure.com](https://portal.azure.com)
2. Login with your Azure account
3. In the top Search bar, type "Storage accounts"
4. Click on "+ Create"
5. Fill in the required fields
6. Click on "Review + create"
7. Click on "Create"
Storage account settings:
- **Subscription**: Select your Azure subscription
- **Resource Group**: Create new Resource Group or select existing
- **Storage account name**: Choose a name for your storage account
- **Location**: Select a location near you
- **Performance**: Premium ⚠️ we will require low latency and high throughput
- **Premium account type**: Block blobs (high transaction rates)
- **Redundancy**: Locally-redundant Storage (LRS)
Once the deployment is complete, you will see the newly created storage account in the list.

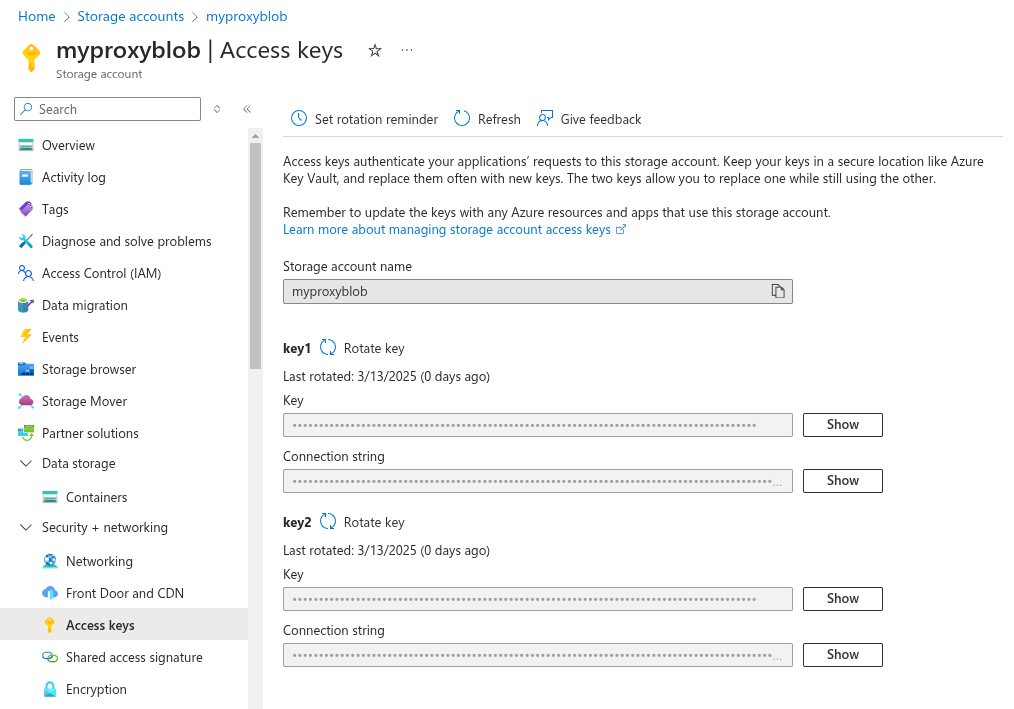
Finally, click on "Security + networking" and then "Access keys" to get the storage account key.
Here are the steps to create a storage account using the Azure CLI:
```bash
# Login to Azure
az login
# Create a resource group
az group create --name "proxyblob-resource-group" --location "Central US"
# Create a storage account
az storage account create --name "myproxyblob" --resource-group "proxyblob-resource-group" --location "Central US" --sku "Premium_LRS" --kind BlockBlobStorage
# Get the storage account key
az storage account keys list --account-name "myproxyblob" --output table
```
You should see displayed the storage account keys.
#### Azurite
If you want to test the tool, you can also use [Azurite](https://github.com/Azure/Azurite), a lightweight server clone of Azure Storage that can be run locally. To install Azurite, I recommend using either [Visual Studio Code extension](https://marketplace.visualstudio.com/items?itemName=Azurite.azurite) or [Docker](https://hub.docker.com/r/microsoft/azure-storage-azurite).
For the extension, installation is straightforward:
1. Go to the Extensions tab
2. Search for `Azurite.azurite`
3. Click "Install"
You should see down right of your editor 3 buttons like this:
```
[Azurite Table Service] [Azurie Queue Service] [Azurite Blob Service]
```
Press on the `[Azurite Blob Service]` and the service should be running.
For Docker, you will have to pull the image and run it:
```bash
docker pull mcr.microsoft.com/azure-storage/azurite
docker run -p 10000:10000 mcr.microsoft.com/azure-storage/azurite
```
The default storage account name is `devstoreaccount1` and the account key is `Eby8vdM02xNOcqFlqUwJPLlmEtlCDXJ1OUzFT50uSRZ6IFsuFq2UVErCz4I6tq/K1SZFPTOtr/KBHBeksoGMGw==`.
## Installation
```bash
# Clone the repository (include submodules)
git clone --recurse-submodules https://github.com/quarkslab/proxyblob
cd proxyblob
# Build all components
make
```
This will produce the following binaries:
- `proxy` - the proxy server running on your machine
- `agent` - the agent running on the target
- `agent.wasm` - the agent compiled for WebAssembly
The WASM agent requires the JS host runtime to expose two global functions:
```js
// Open a TCP connection to host:port, call callbacks on events
TCPDial(host, port, onConnect, onData, onClose, onError)
// Bind a UDP socket on a random port, call callbacks on events
UDPListen(onBind, onData, onError)
```
The runner is responsible for implementing these using the runtime's native APIs (e.g. Bun: `Bun.connect` / `Bun.udpSocket`, Node.js: `net` / `dgram`).
You can also build targets individually:
```bash
make proxy # proxy server only
make agent # native agent only
make wasm # WASM agent only
make agent TOKEN= # native agent with embedded connection string
make wasm TOKEN= # WASM agent with embedded connection string
```
## Configuration
Create a `config.json` file based on the [example](example_config.json) with your Azure Storage credentials:
```json
{
"listeners": [
{
"name": "blob-listener",
"driver": "azblob",
"address": "https://proxyblob.blob.core.windows.net",
"storage_account": "proxyblob",
"storage_account_key": "your_account_key"
},
{
"name": "queue-listener",
"driver": "azqueue",
"address": "http://127.0.0.1:10001",
"storage_account": "devstoreaccount1",
"storage_account_key": "Eby8vdM02xNOcqFlqUwJPLlmEtlCDXJ1OUzFT50uSRZ6IFsuFq2UVErCz4I6tq/K1SZFPTOtr/KBHBeksoGMGw=="
}
]
}
```
You can configure multiple listeners and manage them in the proxy CLI.
## Usage
### Starting the Proxy Server
```bash
./proxy -c my-config.json # if omitted, config.json is used by default
```
This will start an interactive CLI with the following commands:
```
Commands:
agent manage agents
clear clear the screen
exit exit the shell
help use 'help [command]' for command help
listener manage listeners
new generate a new connection string for an agent
```
Once the proxy server is running, start a listener. The started listener automatically becomes the default for subsequent commands.
```
proxyblob » listener start blob-local-listener
21:23:25 INF Aznet listener started and set as default addr=http://127.0.0.1:10000 driver=azblob listener_id=blob-local-listener
```
Then you can generate a connection string by using the `new` command.
```
proxyblob » new
21:25:10 INF Connection string generated connection_string=YXpibG9ifGh0dHA6Ly8xMjcuMC4wLjE6MTAwMDAvZGV2c3RvcmVhY2NvdW50MT9oYW5kc2hha2U9YzJVOU1qQXlOaTB3TWkweE5sUXlNQ1V6UVRJMUpUTkJNVEJhSm5OcFp6MDRlR3ByVjJFeVNXdHhWWEJxUlU1cGJIVmtOVGhuWXpkNU5raDNXWEZNUmpZNVFrNDVaMUphT1ZNMEpUTkVKbk53UFdGamR5WnpjSEk5YUhSMGNITWxNa05vZEhSd0puTnlQV01tYzNROU1qQXlOaTB3TWkweE5WUXlNQ1V6UVRJd0pUTkJNVEJhSm5OMlBUSXdNalV0TVRFdE1EVSUzRCZ0b2tlbj1jMlU5TWpBeU5pMHdNaTB4TmxReU1DVXpRVEkxSlROQk1UQmFKbk5wWnowM2NXZ3dZVWgxV1dKTE1rcGlOVVYyVG5WTk1XdEpTMFJFVTFkVGNFWlllVXd5ZUV0dWRYaG9jVWc0SlRORUpuTndQWEpzSm5Od2NqMW9kSFJ3Y3lVeVEyaDBkSEFtYzNJOVl5WnpkRDB5TURJMkxUQXlMVEUxVkRJd0pUTkJNakFsTTBFeE1Gb21jM1k5TWpBeU5TMHhNUzB3TlElM0QlM0Q listener_id=blob-local-listener
```
Use the generated connection string with the agent (see below [Starting the Agent](#starting-the-agent)). If the agent connects successfully, you should see its identity (`user@host`) in the "Info" column when you list agents.
```
proxyblob » agent ls
╭──────────────────────────────────────┬─────────────────┬──────────────────────┬────────────┬─────────────────────┬───────────╮
│ AGENT ID │ INFO │ LISTENER │ PROXY PORT │ CONNECTED AT │ LAST SEEN │
├──────────────────────────────────────┼─────────────────┼──────────────────────┼────────────┼─────────────────────┼───────────┤
│ 7b5af883-7cc7-45a4-8599-da906753005d │ atsika@mac.home │ blob-local-listener │ 1080 │ 2026-02-15 21:50:04 │ 2m ago │
╰──────────────────────────────────────┴─────────────────┴──────────────────────┴────────────┴─────────────────────┴───────────╯
```
Select the agent using `agent select ` and start the proxy listener (by default it listens on localhost:1080) by using the `agent start` command.
```
proxyblob » agent select 7b5af883-7cc7-45a4-8599-da906753005d
22:10:40 INF Agent selected agent_id=7b5af883-7cc7-45a4-8599-da906753005d
7b5af883 » agent start
22:10:46 INF Proxy started agent_id=7b5af883-7cc7-45a4-8599-da906753005d port=1080
```
You can now use for example [proxychains](https://github.com/rofl0r/proxychains-ng) to tunnel the traffic through the SOCKS proxy.
```bash
proxychains xfreerdp /v:dc01.domain.local /u:Administrator
```
### Starting the Agent
In order to run, the agent requires a connection string that can be generated using the proxy. You can pass it as an argument or directly embed it at compile-time.
```bash
# Via argument
./agent -c
# Build the agent with embedded connection string
make agent TOKEN=
./agent
```
## Architecture
The communication flow works like this:
1. The agent periodically polls an Azure Blob container for encoded packets in a request blob
2. The proxy writes encoded packets to the Azure Blob container in a request blob
3. When the agent finds a packet, it processes it and writes the response back to a response blob
4. The proxy reads the response and maintains the SOCKS connection with client applications
The global flow is the following:
```mermaid
graph TB
%% Client applications
Client1[Client Application] -->|SOCKS5 Request| SocksServer
Client2[Web Browser] -->|SOCKS5 Request| SocksServer
%% Proxy Server Components
subgraph "Proxy Server (Local Machine)"
SocksServer[SOCKS5 Server]
CLI[Interactive CLI]
ProxyHandler[Proxy Handler]
TransportP[Blob Transport]
end
%% Connection between components
CLI -->|Commands| SocksServer
SocksServer -->|Process Request| ProxyHandler
ProxyHandler -->|Encode Packets| TransportP
TransportP -->|Receive Responses| ProxyHandler
ProxyHandler -->|Return Data| SocksServer
%% Azure Blob Storage
subgraph "Azure Blob Storage"
RequestBlob[Request Blob]
ResponseBlob[Response Blob]
end
%% Connection to Azure
TransportP -->|Write| RequestBlob
ResponseBlob -->|Read| TransportP
%% Agent Components
subgraph "Agent (Target Network)"
AgentPoller[Polling Component]
TransportA[Blob Transport]
SocksHandler[SOCKS Handler]
CommandProcessor[Command Processor]
end
%% Agent connections
RequestBlob -->|Poll| AgentPoller
AgentPoller -->|Process| TransportA
TransportA -->|Decode Packets| SocksHandler
SocksHandler -->|Process Commands| CommandProcessor
%% Command Processing
subgraph "Command Processing"
Connect["CONNECT"]
Bind["TODO: BIND"]
UDP["UDP ASSOCIATE"]
end
CommandProcessor -->|Route| Connect
CommandProcessor -->|Route| Bind
CommandProcessor -->|Route| UDP
%% Target Connections
Connect -->|TCP Connection| TargetServer1[Target Server]
UDP -->|UDP Connection| TargetServer2[Target Server]
%% Return path
TargetServer1 -->|Response Data| SocksHandler
TargetServer2 -->|UDP Data| SocksHandler
SocksHandler -->|Encode Response| TransportA
TransportA -->|Write| ResponseBlob
```
An example of a CONNECT operation is the following:
```mermaid
sequenceDiagram
participant Client as Client Application
participant Proxy as Proxy Server
participant AzureStor as Azure Blob Storage
participant Agent as Agent
participant Target as Target Server
Note over Client,Target: SOCKS5 Protocol Flow
%% Proxy Server and Agent Initialization
Proxy->>AzureStor: Initialize connection
Agent->>AzureStor: Start polling for requests
%% Client Connection and Authentication
Client->>Proxy: TCP Connection
Proxy->>Client: Auth methods (NoAuth supported)
Client->>Proxy: Select Auth method
%% Command Processing
Client->>Proxy: CONNECT command + target address
Proxy->>AzureStor: Write CONNECT request packet to Request Blob
Agent->>AzureStor: Poll and retrieve CONNECT request
%% Target Connection
Agent->>Target: Establish TCP connection
Target->>Agent: Connection established
Agent->>AzureStor: Write connection success to Response Blob
Proxy->>AzureStor: Poll and retrieve response
Proxy->>Client: CONNECT success response
%% Data Transfer (Bidirectional)
Client->>Proxy: Send data
Proxy->>AzureStor: Write data packet to Request Blob
Agent->>AzureStor: Poll and retrieve data packet
Agent->>Target: Forward data
Target->>Agent: Response data
Agent->>AzureStor: Write response data to Response Blob
Proxy->>AzureStor: Poll and retrieve response data
Proxy->>Client: Forward response data
```
## Troubleshooting
**Why does my agent immediately stop running ?**
There might be several reasons why your agent stops immediately after you run it. Check its exit code:
```sh
# Bash
echo $?
```
```cmd
REM CMD
echo %ERRORLEVEL%
```
```pwsh
# PowerShell
echo $LastExitCode
```
Each exit code describes why the agent stopped running:
| Exit code | Reason |
| --------- | ------------------------------------------- |
| 0 | No error |
| 1 | The context has been canceled |
| 2 | The connection string is missing |
| 3 | The connection string is invalid or expired |
If you encounter issues:
1. Check Azure credentials and permissions
2. Verify connectivity to Azure Blob Storage
3. Check for any firewall rules blocking outbound connections
4. Ensure the agent is running and properly connected
## TODO
- BIND command (not implemented yet)
- Improve proxy speed even more
## CHANGELOG
**ProxyBlob v2.1 (WASM agent) - 19/03/2026:**
- WebAssembly agent build target (`agent.wasm`) for deployment in JavaScript runtimes (Bun, Node.js, etc.)
- Build tag separation for JS/native network and UDP code
- Refactored UDP relay into a shared, platform-agnostic layer
**ProxyBlob v2 (aznet boosted) - 16/02/2026:**
- Complete architecture rewrite using aznet networking layer
- Multiple Azure Storage backends (Blob, Queue, Table Storage)
- Last seen timestamps for connected agents
- Enhanced connection management and lifecycle
- Better error handling and recovery mechanisms
- Improved polling efficiency with adaptive intervals
- Automatic connection cleanup and resource management
- Significantly higher throughput and lower latency
- Cost optimization through backend selection
- Multi-listener configuration support
**ProxyBlob public release - 29/04/2025:**
- SOCKS5 protocol (CONNECT and UDP ASSOCIATE)
- Reverse client-server architecture
- Azure Blob Storage communication
- Interactive CLI with auto-completion
- Multi-agent management
- Local or remote proxy server
- Container-based communication
- Connection string authentication
- Error handling
- Azurite support for local development
## License
[GNU GPLv3 License](LICENSE)
---
Made with ❤️ by [@_atsika](https://x.com/_atsika)