You will find here some informations on how to get, build and use our project.
Getting the sources and building
We maintain several branches: the one named llvm-4.0 is the latest official (i.e., non-dev) version and is based on the latest version 4.0.1 released by the LLVM team. Older branches are also available: llvm-3.3, llvm-3.4, llvm-3.5, llvm-3.6.1
At the moment, all our obfuscation transforms have been ported in all branches.
To get the latest version of the LLVM branch, you can use the following commands:
$ git clone -b llvm-4.0 https://github.com/obfuscator-llvm/obfuscator.git
$ mkdir build
$ cd build
$ cmake -DCMAKE_BUILD_TYPE=Release -DLLVM_CREATE_XCODE_TOOLCHAIN=ON ../obfuscator/
$ make -j7
llvm-10 and later
$ cmake -DCMAKE_BUILD_TYPE=Release -DLLVM_CREATE_XCODE_TOOLCHAIN=ON ../obfuscator/llvm
llvm-13 and later
$ cmake -DCMAKE_BUILD_TYPE=Release -DLLVM_CREATE_XCODE_TOOLCHAIN=ON -DLLVM_ENABLE_NEW_PASS_MANAGER=OFF ../obfuscator/llvm
Older branches can be accordingly be cloned.
When the build is finished, you should have all the binaries in build/bin.
Note that this source tree contain LLVM and Clang.
How to use it
The simplest way to use Obfuscator-LLVM, is to pass a flag to the LLVM backend from Clang. The current available flags are :
llvm 13 and later
if use legacy pass manager, add cflag -flegacy-pass-manager or cmake -DLLVM_ENABLE_NEW_PASS_MANAGER=OFF.
-flafor the control flow flattening pass-subfor the instruction substitution pass-bcffor the bogus control flow pass
For annotations, see Functions annotations.
Imagine that you have a code file named test.c and that you want to use the substitution pass; just call clang like that :
$ path_to_the/build/bin/clang test.c -o test -mllvm -sub
Of course, you can call more than one pass at a time (e.g flattening and substitutions) :
$ path_to_the/build/bin/clang test.c -o test -mllvm -sub -mllvm -fla
If you have a project using the 'autotools' and you want to compile it with obfuscation, you can do that :
$ CC=path_to_the/build/bin/clang
$ CFLAGS+="-mllvm -fla" or CXXFLAGS+="-mllvm -fla" (or any other obfuscation-related flags)
$ ./configure
$ make
If you have questions, don't hesitate to [contact](How to Contribute) us.
Integration into Visual Studio
cmake -G "Visual Studio 16 2019" -DCMAKE_BUILD_TYPE=Release ../obfuscator/
Please consult the official documentation
Integration into NDK
To install CMake and the default NDK in Android Studio, do the following:
- With a project open, click Tools > SDK Manager.
- Click the SDK Tools tab.
- Select the NDK (Side by side) and CMake checkboxes.
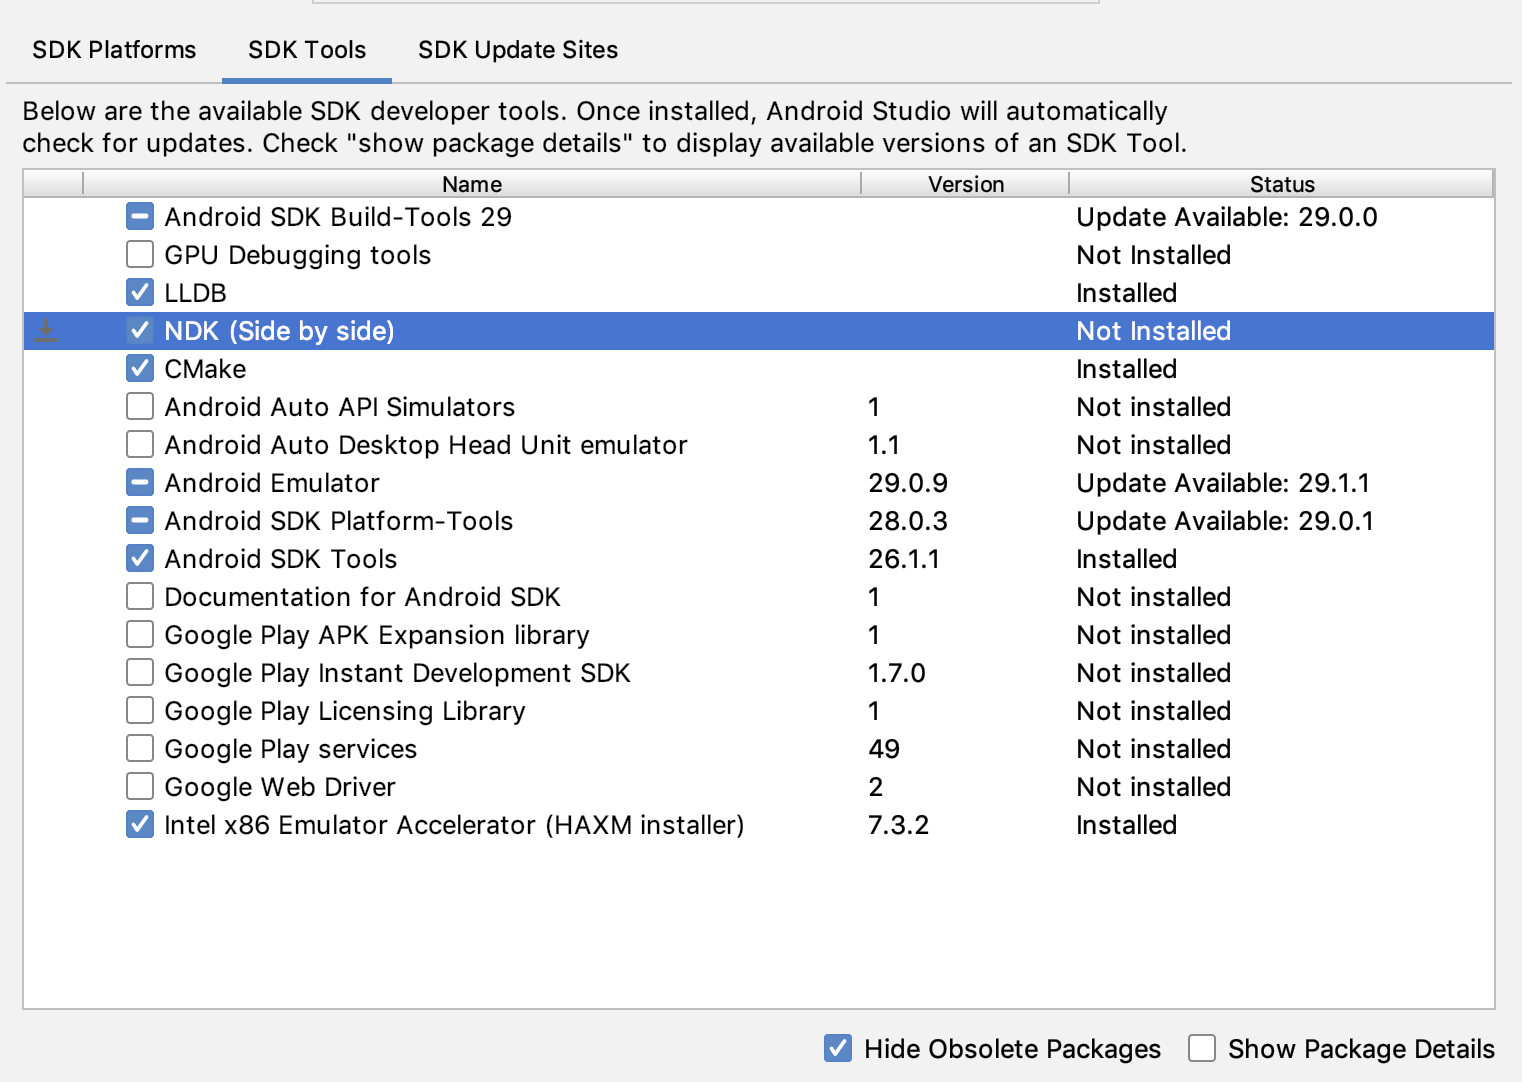
You have multiple versions of the NDK installed and you want to use a specific one. In this case, specify the version using the android.ndkVersion property in the module's build.gradle file, as shown in the following code sample.
android {
    ndkVersion "major.minor.build" // e.g.,  ndkVersion "21.3.6528147"
}
Use ndk-build
cp -r Android/sdk/ndk/xx.x.xxxxxx/toolchains/llvm Android/sdk/ndk/xx.x.xxxxxx/toolchains/ollvm
rm -rf Android/sdk/ndk/xx.x.xxxxxx/toolchains/ollvm/prebuilt/darwin-x86_64/bin
rm -rf Android/sdk/ndk/xx.x.xxxxxx/toolchains/ollvm/prebuilt/darwin-x86_64/lib64
mv build/bin/ Android/sdk/ndk/xx.x.xxxxxx/toolchains/ollvm/prebuilt/darwin-x86_64/bin/
mv build/lib/ Android/sdk/ndk/xx.x.xxxxxx/toolchains/ollvm/prebuilt/darwin-x86_64/lib64/
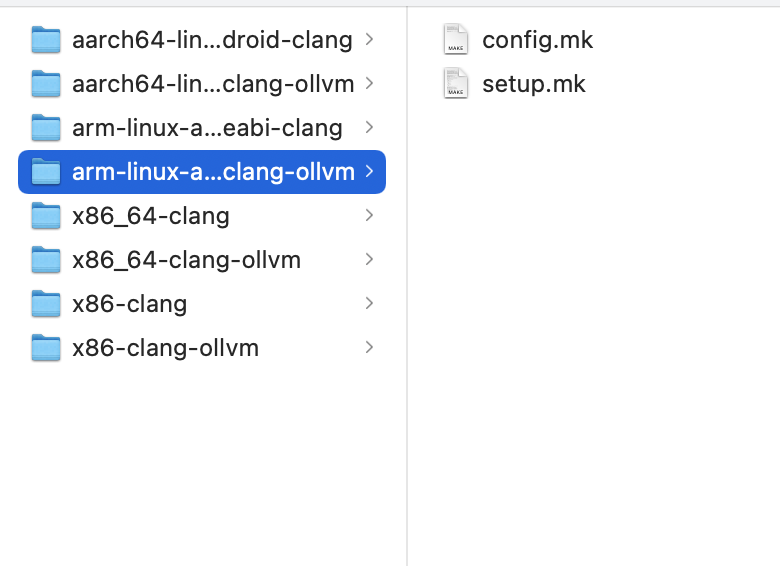
cp -r Android/sdk/ndk/xx.x.xxxxxx/build/core/toolchains/aarch64-linux-android-clang Android/sdk/ndk/xx.x.xxxxxx/build/core/toolchains/aarch64-linux-android-clang-ollvm
cp -r Android/sdk/ndk/xx.x.xxxxxx/build/core/toolchains/arm-linux-androideabi-clang Android/sdk/ndk/xx.x.xxxxxx/build/core/toolchains/arm-linux-androideabi-clang-ollvm
cp -r Android/sdk/ndk/xx.x.xxxxxx/build/core/toolchains/x86_64-clang Android/sdk/ndk/xx.x.xxxxxx/build/core/toolchains/x86_64-clang-ollvm
cp -r Android/sdk/ndk/xx.x.xxxxxx/build/core/toolchains/x86-clang-clang Android/sdk/ndk/xx.x.xxxxxx/build/core/toolchains/x86-clang-ollvm
Change Android/sdk/ndk/xx.x.xxxxxx/build/core/xxxxxx-ollvm/setup.mk
TOOLCHAIN_NAME := ollvm
TOOLCHAIN_ROOT := $(call get-toolchain-root,$(TOOLCHAIN_NAME))
TOOLCHAIN_PREFIX := $(TOOLCHAIN_ROOT)/bin
Change Android/sdk/ndk/xx.x.xxxxxx/build/core/setup-toolchain.mk
 		ifneq ($(words $(TARGET_TOOLCHAIN_LIST)),1)
        $(call __ndk_error,Expected two items in TARGET_TOOLCHAIN_LIST, \
            found "$(TARGET_TOOLCHAIN_LIST)")
    endif
Then:
 		ifneq ($(words $(TARGET_TOOLCHAIN_LIST)),2)
        $(call __ndk_error,Expected two items in TARGET_TOOLCHAIN_LIST, \
            found "$(TARGET_TOOLCHAIN_LIST)")
    endif
In Project
Android.mk
LOCAL_CFLAGS += -mllvm -sub -mllvm -bcf -mllvm -fla
Application.mk
APP_ABI := x86 armeabi-v7a x86_64 arm64-v8a mips armeabi mips64
NDK_TOOLCHAIN_VERSION := ollvm
Use CMake
Copy ndk's version folder ,replace bin and lib or lib64 folder.
Integration into Xcode
To use o-llvm within Xcode, you have to write a Xcode plugin.
This tutorial is based on this one. It was tested with Xcode 8.2. It‘s still available in Xcode9 but need to set Enable Index-While-Building to NO.
$ cd /Applications/Xcode.app/Contents/PlugIns/Xcode3Core.ideplugin/Contents/SharedSupport/Developer/Library/Xcode/Plug-ins/
$ sudo cp -r Clang\ LLVM\ 1.0.xcplugin/ Obfuscator.xcplugin
$ cd Obfuscator.xcplugin/Contents/
$ sudo plutil -convert xml1 Info.plist
$ sudo vim Info.plist
Change:
<string>com.apple.compilers.clang</string> -> <string>com.apple.compilers.obfuscator</string>
<string>Clang LLVM 1.0 Compiler Xcode Plug-in</string> -> <string>Obfuscator Xcode Plug-in</string>
Then:
$ sudo plutil -convert binary1 Info.plist
$ cd Resources/
$ sudo mv Clang\ LLVM\ 1.0.xcspec Obfuscator.xcspec
$ sudo vim Obfuscator.xcspec
Change:
<key>Description</key>
<string>Apple LLVM 8.0 compiler</string> -> <string>Obfuscator 4.0 compiler</string>
<key>ExecPath</key>
<string>clang</string> -> <string>/path/to/obfuscator_bin/clang</string>
<key>Identifier</key>
<string>com.apple.compilers.llvm.clang.1_0</string> -> <string>com.apple.compilers.llvm.obfuscator.4_0</string>
<key>Name</key>
<string>Apple LLVM 8.0</string> -> <string>Obfuscator 4.0</string>
<key>Vendor</key>
<string>Apple</string> -> <string>HEIG-VD</string>
<key>Version</key>
<string>7.0</string> -> <string>4.0</string>
Then:
$ cd English.lproj/
$ sudo mv Apple\ LLVM\ 5.1.strings "Obfuscator 3.4.strings"
$ sudo plutil -convert xml1 Obfuscator\ 3.4.strings
$ sudo vim Obfuscator\ 3.4.strings
Change:
<key>Description</key>
<string>Apple LLVM 8.0 compiler</string> -> <string>Obfuscator 4.0 compiler</string>
<key>Name</key>
<string>Apple LLVM 8.0</string> -> <string>Obfuscator 4.0</string>
<key>Vendor</key>
<string>Apple</string> -> <string>HEIG-VD</string>
<key>Version</key>
<string>7.0</string> -> <string>4.0</string>
Then:
$ sudo plutil -convert binary1 Obfuscator\ 3.4.strings
Now, you can open Xcode and set the new compiler in your project settings:
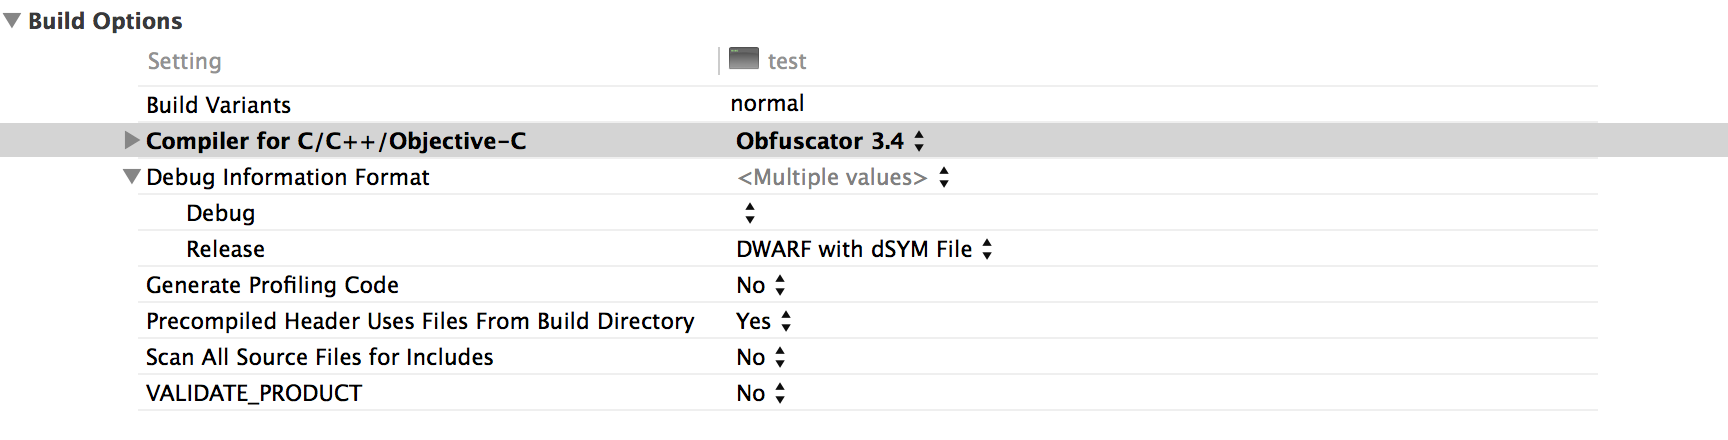
And you can add your obfuscation flags to the CXXFLAGS or CFLAGS like that:

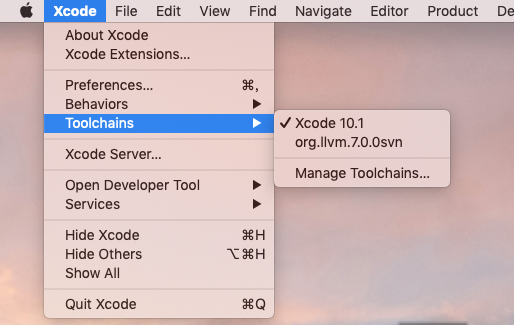
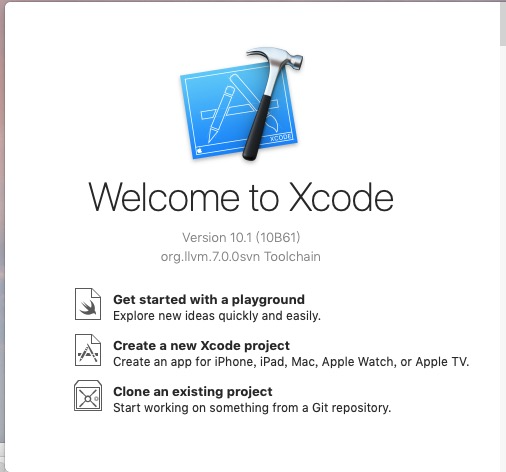
In Xcode 10 you must create Toolchains .
cd build
sudo make install-xcode-toolchain
mv /usr/local/Toolchains  /Library/Developer/
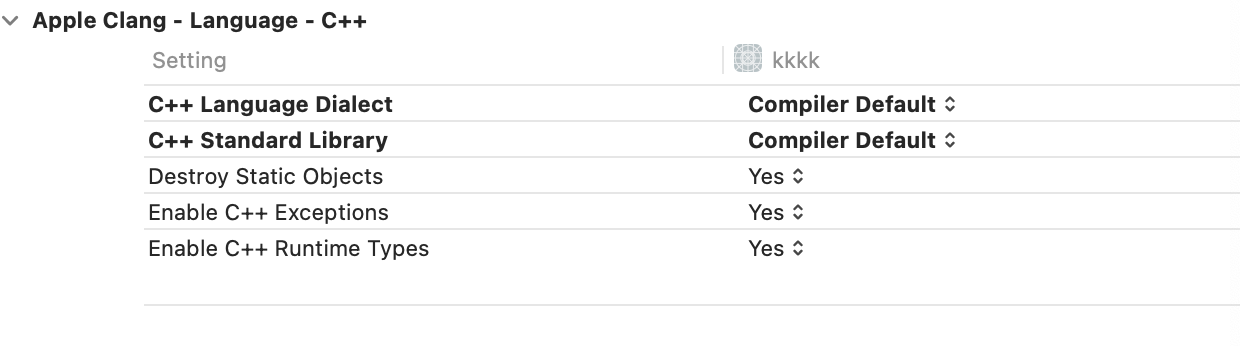
In Xcode 12 and Later you must set C++ Language Dialect and C++ Standard Library.
cd build
cmake -DCMAKE_BUILD_TYPE=Release -DLLVM_CREATE_XCODE_TOOLCHAIN=ON -DLLVM_ENABLE_PROJECTS="clang;libcxx;libcxxabi" ../obfuscator/
make -j7
sudo make install-xcode-toolchain
mv /usr/local/Toolchains  /Library/Developer/